Learn how to use Google Consent Mode v2 with WordPress and with Beautiful Cookie Banner WordPress plugin. This article gives you a brief intro in Google Consent Mode and shows an easy way how to optimize WordPress with Beautiful Cookie Banner plugin.
Table of Contents
- Why is consent mode v2 important?
- What options do you have?
- Consent mode v2 for WordPress implementation example
Why is consent mode v2 important?
You get a much better tracking accuracy as the traffic and conversion you are missing due to user opt-out will be modelled.
From March on Google Tracking products like Google Ads tracking, Google Analytics 4 and Google Floodlights need consent mode to work properly.
What options do you have?
You can set up the Basic implementation or the Advanced version of it.
Basic
You just push the consent information additionally to the dataLayer. That’s it. Official docs: https://developers.google.com/tag-platform/security/concepts/consent-mode?hl=en
If you have already a working set up, you just set up consent mode additionally. Then additional Information, which is required by google, is added to the google tracking requests.
If you start from scratch you first make sure, that the tags fire when there is consent. You can do this with the “blocking feature” of the premium plugin or with Google Tag Manager (recommended) see here for more info. If that is set up, just add the consent mode signals to get the consent mode infos additionally.
Advanced
You push the consent information to the dataLayer, same as Basic. Additionally you fire all Google Tags always. Independent from the user’s consent. You rely here on the Google tags to handle the data in a GDPR friendly way.
This version is quite controversial from a data privacy point of view. This is why I focus in this article on how to implement the basic version.
Consent mode v2 for WordPress implementation example
Disclaimer: This article does not contain any legal advice of any kind. It only describes the technical implementation.
For Google Tags the important parameters are:
- analytics_storage
- ad_storage
- ad_user_data (new in v2)
- ad_personalization (new in v2)
Configuration WordPress Cookie Banner
All these examples use this Cookie Banner WordPress Plugin
Configuration examples
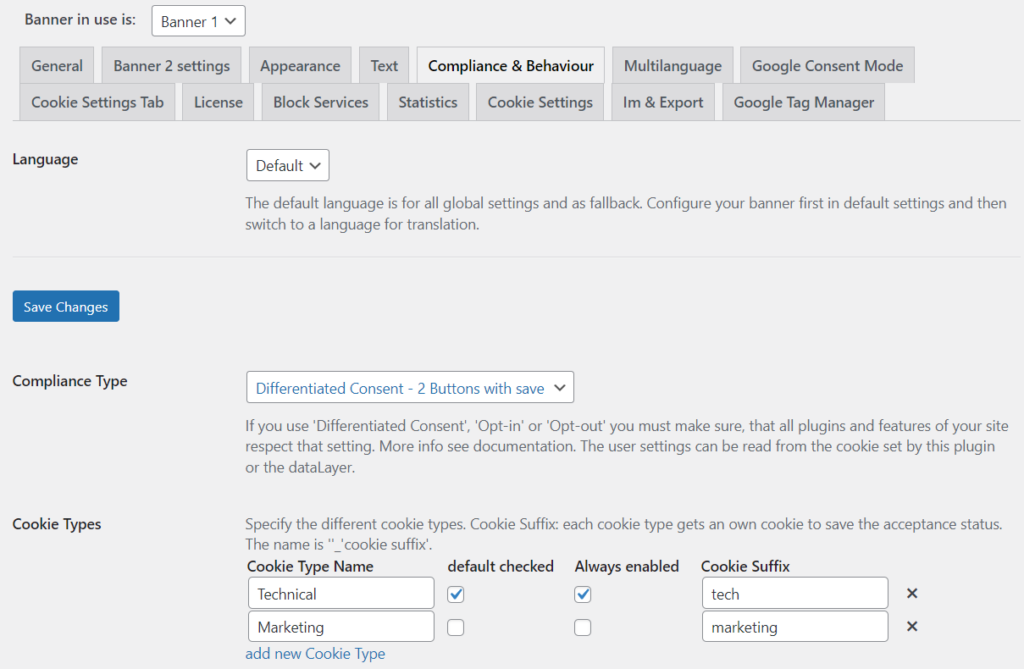
Example 1: Banner 1 – Compliance type: Differentiated Consent
Compliance Settings

Consent Mode Settings

Result
On first page load the results will look like this
- analytics_storage: denied
- ad_storage: denied
- ad_personalization: granted
- ad_user_data: granted
- functionality_storage: granted
- personalization_storage: denied
- security_storage: denied
ad_personalization, ad_user_data and functionality_storage are granted, because tech is “default checked”
If the user now allows marketing everything, except security_storage will be granted.
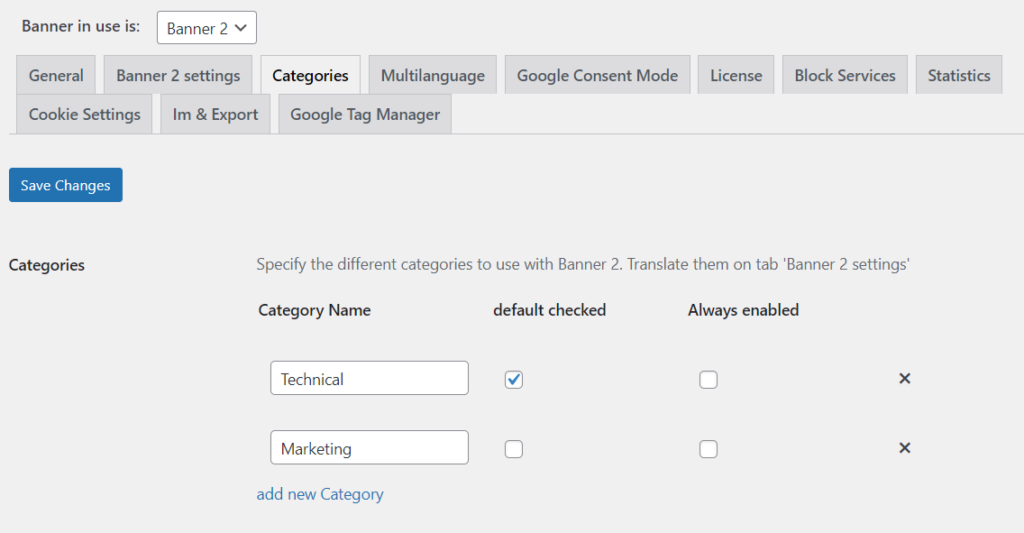
Example 2: Banner settings for Banner 2
Compliance Settings
The Banner 2 config looks similar

Consent Mode Settings

Result
Tool used in screenshots is Tag Assistant.
On first page load the results will look like this

ad_personalization, ad_user_data and functionality_storage are granted, because technical is “default checked” in Categories/Cookie Types settings.
If the user now allows marketing everything, except security_storage will be granted.
Next page view of user:
The default is still “denied” but the “update” with granted comes immediately after the default event.

Example 3: Banner settings for Banner 1 – compliance type: opt-in
Compliance Settings

Consent Mode Settings

Result
Tool used in screenshots is Tag Assistant.
On first page load the results will look like this

analytics_storage, ad_storage are granted, because the toggles are enabled for “opt-in/default”.
If the user now opts-in everything, except analytics_storage will be granted. analytics_storage is changed to “denied”, because only the toogle for “opt-out” is enabled. It is not allowed if the user opts-in.
In reality you often want to enable both toggles.

Next page view of user:
The default is still “denied” but the “update” with granted comes immediately after the default event.

That’s it. Your tags still fire how you have configured them. They just have some additional parameters added to the request.
For more unofficial background information of consent mode and how to debug and test it, see this German blog post: markus-baersch.de/blog/consent-mode-2-0-faq/ Unfortunately it is in German, but the build in translation feature of the major browser can help with that.
And here is a good article in english: simoahava.com/analytics/consent-mode-v2-google-tags/
Next Step
How to test Google Consent Mode v2 implementation
Disclaimer: This article does not contain any legal advice of any kind. It only describes the technical implementation.
Tool used to create the screenshots: Tag Assistant.